Saturday, 20 December 2014

Nature's Presence

                                                  Nature's Presence

                                                In a world of chaos,
                                                She stands so still,
                                               Leading by example
                                               for those who will!

                                             Teaching us presence
                                                 along her shores,
                                          Lose focus for a second
                                          and end up on all fours.

                                          Surrounded by reflection
                                               of what lies within,
                                             Pause for a moment
                                  for its like nowhere you've been!

                                            A pathway of rainbows
                                              gradually disappear,
                                       While the dance of the rain
                                                  removes all fear.

                                                  Guided by light
                                      I see waves of clouds above,
                                             I feel a passion inside
                                          only a surfer would love.

                                      Who knew the ego was not me?
                                             Living from the heart
                                                 I feel totally free!

                                                  One final word
                                         and I'll leave you with this,
                                                Say yes to nature
                                            and live a life of bliss.

Friday, 24 October 2014

Coconut bundt

Coconut Milk Cake by Marian Keyes 


Ingredients
170g butter
300g caster sugar
4 eggs
1 tbsp vanilla extract
250g self raising flour
Pinch of salt
3/4 tsp baking powder
50g dissecated coconut
200ml coconut milk

Syrup
200ml coconut milk
40g light brown soft sugar


1. Preheat the oven to 170 degrees and spray a bundt tin with easy release spray.

2. Beat the eggs & the sugar until plain and fluffy. Add eggs Individually mixing well. Add vanilla extract. In another bowl mix the sieved flour, salt, baking powder and coconut.

3. Pour 1/3 of the coconut milk and the same of the flour mix into the butter and eggs and mix well. 

4. Add another third of each and then add the final amount.

5. Pour into the pan and bake for 1 hr. 

6. Cool on a wire rack then using a skewer prick the top all over. 

7. Make the syrup by gently heating the coconut milk and sugar together .Then pour half over the cake and few hours later pour the rest and allow to soak through.

Friday, 19 September 2014

Traditional Irish Apple Cake

Lately I find myself wondering about how our grandparents baked. What kind of stuff did they bake? How did they manage without a weighing scales? A fist of this and a fist of that is the answer I get when I ask. After being given a wonderful present of cooking apples I wanted to try something new.  So here it is.....

Ingredients
3 Cups Plain flour
2 Tsp Baking powder
1/8 Tsp of salt
4 oz Butter
3/4 Cup of sugar
4 Cooking apples
2 eggs
1/4 cup of milk
2 Tbsp of sugar to sprinkle.

Method
1. Preheat the oven to 170 degrees. Grease a 9 inch round cake tin.
2. Get an enormous bowl and sift in the flour, baking powder and salt. Mix thoroughly.
3. Slice the butter fairly thick and rub the flour mix and butter together until you either drop or breadcrumbs appear.
4.Add the sugar and mix.
5. Slice the apples into quaters of course making sure they are peeled.
6. Beat the eggs and milk and add to the apples and flour. Mix.
7. Pour the mixture into the baking pan and flatten the top. Sprinkle with sugar. Bake for 50  minutes.

Thursday, 18 September 2014

Not so Marvellous Creations

Until recently I hadn't even heard of these bars. So clearly for baking purposes I tried one and my goodness they are tasty. Inside the chocolate there is wait for it.... popping candy! Wow such a blast from the past along with jellies and smarties. I knew my plan of action with the popping candy and smarties but the jellies were a mystery. I figured they might disappear when baked. So I decided to put jellies in for the full cooking time in 6 cupcakes and try putting frozen jellies in the other six. Neither worked. Oops. However the popping candy and chocolate was delish.

Ingredients
4 1/2oz Plain flour
45g Cocoa
11/2 Tsp baking powder
81/2 oz caster sugar
150ml Milk
75ml Oil
150ml Boiling water
3 boxes of smarties ( some frozen)
30 jellies (some frozen)

Icing
2 sachets of popping candy
113g Butter softened
300g Icing sugar
1 Tsp Vanilla extract
2 Tbsp Milk
Pink colouring

Method
1. Preheat the oven to 180 degrees.
2. In a bowl mix flour, cocoa,  baking powder and sugar.
3. Add milk, oil and egg and whisk till smooth.
4. Add boiling water and whisk.
5.Pour the batter into the cases. Put frozen smarties in all and I put frozen jellies in 6 and regular jellies in the rest. Then bake for 15 min.
6. Once baked allow to cool.
7. I chose pink frosting as there is pink on the wrapper of the bar. Although I wanted electric pink the lack of colouring in my press determined it would be baby pink :).
8. For the frosting whisk the butter for 3 minutes.  Add icing sugar and whisk for a further  few minutes.  Then add vanilla, colouring and milk.
9. Pipe onto the cupcakes, sprinkle popping candy ontop and decorate with smarties and jellies.

I intend to revisit this challenge with some advice a friend gave me so fingers crossed !!

Ferraro Rocher Cupcakes

Ferraro Rocher have always been popular in the Mac Mahon household. The hulk himself wouldn't hold mammy Chrissie back from a box. I wasn't quite brave enough to bake a Ferraro Rocher in the centre instead I infused it with Nutella. I may possibly have shares in Nutella by now! The most sickening thing about this challenge had to be the thoughts of spending a fortune on a box of chocolates when I only needed a few, then it struck me...... remember those wee packs of 3 chocolates hmmm I wonder if they are still about. After some manic searching involving 4 supermarket staff the final pack left in the store was found.

Ingredients
4 1/2 oz Plain flour
45g Cocoa
1 1/2 Tsp of baking powder
8 1/2oz Caster sugar
150ml Milk
75g Olive oil
1 egg
150ml Boiling water
Nutella
12 Ferraro Rocher
Icing
230g Unsalted butter
240g Icing sugar
222g Nutella
3-4 Tbsp heavy cream
2 Tsp Vanilla essence
Sprinkle of salt

Method
1. Preheat the oven to 180 degrees and eat a Ferraro Rocher :)
2. In a bowl mix flour,cocoa, baking powder, sugar and sweat and tears.
3. Add milk, oil and egg and beat till smooth.
4. Add boiling water and beat then pour into cases and bake for 15 minutes.
5. Remove and allow to cool. Eat another Ferraro Rocher and have a sip of wine to wash it down :)
Now using a knife carve a hole in the centre of the cake and fill with Nutella.
6.To make the icing. Whisk the butter for eternity or 3 minutes. Then add icing sugar and whisk. Then add Nutella, cream and essence. Keep whisking until satisfied.
7. Pipe the frosting onto the cupcakes.
8. Now for decor! Grab a sandwiche bag and pop a few chocolates in, then using a rolling pin crush the chocolates by banging them. Then remove from the bag and sprinkle ontop of the frosting.
9. Place a chocolate ontop of each cake. 

I hope you enjoy these as much as mammy Chrissie x 


Saturday, 13 September 2014

Bake a difference Pieta House fundraiser

The prevention of suicide and self harm is something very close to my heart. It can knock on anybody's door at anytime including my own. Pieta House offer a service second to none.They now have a staff of 170 and the demand for their services hasn’t let up. In 2013, nearly 4,000 people came to Pieta House for help and the numbers contacting are rising all the time. As 90% of their income comes from fundraising events, they rely heavily on fundraising. This is where us bakers come in.

As part of my recovery I depend on baking as a form of therapy and this is where the idea of 'Bake a difference' came from.

Last year I held a bake sale to raise money for Pieta House. This year I have a new concept which I would love your help with. Each baker would pledge some of their home baking to be sold with all the money raised going to Pieta House.Every little counts so no matter how big or small your contribution would make a massive difference!

Rather than holding a giant bake sale event at 1 venue my new idea is a little different. Its called 'Bake a difference'. It has its own donation page on my charity.ie.  Each baker then advertises their own baking and sells it with the final amount being donated through the my charity page. For example i'll advertise some on my facebook page and sell from there.This allows bakers from all over Ireland to come together and bake a difference at a time most suitable to them. The end date for donations would be October 19th. Your support would mean the world and I really do feel together we can Bake a difference.

Please let me know if you wish to join me by private messaging me. 

http://www.mycharity.ie/event/bakeadifference

Monday, 8 September 2014

Bready Bears

I have tried to avoid baking bread as much as possible but there comes a day when one must face their fears! Bread puts the fear of god through me. However I figured if I could make it fun it might not be so bad. Introducing bready bears my solution.

Ingredients

1 pack of yeast -The same stuff used for pizzas. See I've saved you looking puzzled in the baking aisle like me. 

1 - 1 1/2 cups of warm water - its recommended 110 degrees but I'm too cheap to buy a thermometer instead I stuck my finger in and tested for warmer than tepid.

1/2 cup of warm milk -Same genius temperature check of course.

3 Tbsp butter softened.

3 Tbsp caster sugar.

2 Tsp salt.

5 1/4 - 5 3/4 cups of plain flour.

12 raisins.

1 egg.

1 Tbsp cold water.

Method

1. In a gigantic bowl dissolve a sachet of yeast in warm water. Add milk,butter, sugar, salt and 3 cups of flour. Beat until smooth. 

2. Stir in the rest of the flour until a stiff dough forms.

3. On a floured surface get the guns out (strong arms) and knead for approx 8 minutes. Pop it into a bowl greased of course and cover with cling film. 1 hr later it should have doubled in size.

4. Uncover the dough and punch the air out. I got to admit its great fun. Then divide into 4 sections. 

5. Cut 1 ball into half shape balls. Cut another into 14 pieces.  

6. On 2 greased baking trays start to assemble. Use the 2 biggest balls as the body. Then the 2halves as the heads. Then position the small balls to make the ears, nose, arms and legs. Cover for another hour to rise.

7. Uncover and cut slits In the ears, eyes, nose & belly button. Insert a raisin in each slit.Glaze with egg.

8. Pop in a preheated oven at 175 degrees for 30 minutes. Remove and cool.

Thursday, 28 August 2014

Red velvet mini bundts

The 1st time I tried to make red velvet it was a massive disaster. After swallowing my pride a year later I'd plucked up the courage to give it another go. The 1 thing to note with red velvet is it's extremely expensive to make. I made mine with cream cheese frosting.With amazing support from friends Esther and Robert I learnt to make chocolate bun cases. I decided these cases would hold the frosting.

Ingredients
2 1/2 cups of plain flour
1 cup of light brown sugar
1 cup of granulated sugar
2 Tbsp cocoa
1 Tsp salt
2 Tsp baking powder
2 eggs at room temperature
1 1/2 cups of olive oil
1 cup of buttermilk at room temperature
2 Tsp of cider vinegar
2 Tsp of vanilla essence
1 Tbsp red food colouring
2 bars of white cooking chocolate

Frosting
8oz of cream cheese ( Philadelphia)
1/2 cup butter at room temperature
2 cups of icing sugar
1 Tsp of vanilla

Method

1.Preheat oven to 170 degrees.

2. Combine flour, brown sugar, white sugar, salt, baking powder and cocoa. Whisk all together.

3. In a seperate bowl whisk the eggs and slowly stream in the oiI. Add vanilla, vinegar and food colouring.

4. Slowly add the dry ingredients to the wet ingredients.  Keep beating on low speed.

5. While the beater is running add buttermilk.

6. Distribute the mix into moulds. I used silicone heart and rose shaped moulds. I made sure to spray the mould with easy release spray first. 

7. Bake for 20 -25minutes.

8. Remove the cakes from the oven and allow to cool. Then turn the moulds upside down and tap the cakes out.

9. After washing the moulds I used them as a template for my chocolate cups. 

10. Melt the cooking chocolate over boiling water and using a paint brush paint the chocolate onto the mould. Pop in the fridge till set then add another layar. Repeat until strong cup is formed. Then remove the chocolate from the mould and store in the fridge.

11. To make the cream cheese frosting whisk the butter for 3 minutes. Then add cream cheese while whisking. Sift in the icing sugar and vanilla. Have a sneaky taste and were ready.


Doggie treats

I love baking for those I love and that includes my baby dog Misty. After my friend Jackie sent me on some recipes I was eager to try a basic one first before giving the others a go. Plus Misty is ridiculously fussy when it comes to eating. Ensuring all ingredients were natural and healthy was a priority for me.

Ingredients
1 cup of oats (Porridge oats)
2 large eggs
1 Tbsp of ground cinnamon (Yuk)
2 Tbsp of water
1 Tbsp pure honey
1-2 Tbsp peanut butter

Method
1. Mix all the ingredients together.
2. Shape into biscuits.
3. Bake at 175 degrees for 20 minutes.

Misty loved these! They went down a TREAT..... dya get it treat lol ok I know that was lame. Enjoy :)

Tuesday, 26 August 2014

Chocolate & vanilla marble bundt

Whats a bundt you might ask? In my opinion its the bees knees of baking.See picture of my bundt pan below. I very much entered this bake blind.With no clue what I was doing. After finding the pan in TKMAXX ( aka heaven) I was mad to give it a try. I spotted some easy release cake spray which in fairness judging by the name is every bakers dream so for €3.99 that went in the basket too. 

Ingredients

2 cups Plain flour

2 Tsp Baking powder

1/2Tsp Salt

3/4 Cup Unsalted butter

1 1/2Cups + 3Tbsp Caster sugar

4 large eggs

1 Tsp Vanilla essence

1/3 Cup Cocoa 

1/3 Cup Hot water

1 Tbsp Instant coffee. I used Maxwell house.

1/4 Tsp Almond Extract

Method

1. Preheat the oven to 175 degrees.

2. Spray the living daylights out of the bundt pan ensuring you get all the hidden dips. 

3. In a jug mix hot water,coffee, cocoa and 3 tbsp sugar. Mix thoroughly until smooth. Check for lumps.

4. Add the almond to the mixture and allow to cool. 

5. In a bowl sift flour, baking powder and salt.

6. In a seperate bowl put butter and beat for 2 minutes, gradually add the sugar and beat for 3 minutes. Add vanilla and beat. 

7. Gradually add the eggs and beat slowly.

8. Slowly add the flour mix. 

9. Transfer half the cake mix into the cool cocoa mix and stir. 

10.Alternatively spoon the cocoa mix and the vanilla mix into the pan. Then using a skewer swirl the stick through the mix creating a marble effect.

11. Bake for 55 minutes to 1 hr.

12. Allow to cool and shrink a little. Then turn the tin upside down and tap.

13. Stand back and admire the view :).

Monday, 25 August 2014

Chocolate custard cake

Boy do I love custard! So when I discovered the custard cake my mind was blown. All made from scratch even though the temptation to grab a tin from the shop was very strong.

Ingredients
4 Eggs -room temperature
1 Tsp Vanilla essence
1 & 1/4 cups of caster sugar
110g Melted butter
1/2cup of plain flour
1/3cup of cocoa
2 cups of lukewarm milk
1 Tbsp icing sugar

Method
1. Preheat the oven to 160 degrees.
2. Grease & line a loaf tin. Well at least thats what I used ;).
3. Seperate the egg yolks from the whites. This is always great fun... not a great one for the nerves.
4. Beat the whites until stiff and put aside.
5. Whisk the egg yolks, vanilla and sugar until creamy.
6. Add melted butter & mix for 30 sec.
7. Add flour and cocoa and mix well.
8. Pour in milk gradually and beat .
9. Add the whites in one third at the time.
10. Pour into the tin and bake for 60 min.
11. Allow to cool and sprinkle with icing sugar.

Strawberry scones

Whats better than a freshly baked scone in the morning! Usually I make sultana scones but for a change I fancied trying strawberries.

Ingredients
Make 6 scones
225g Self raising flour
150ml Buttermilk
Pinch of salt
25g Caster sugar
25g Margarine
1 egg

Method
1. Sift flour and salt into a bowl and mix adding the sugar.
2. Rub in the margarine using your fingers.
3. Add buttermilk and strawberries.
4. Mix and add the egg.
5. Turn out the dough and lightly knead. Then roll out the dough and using a cookie cutter cut out like below.
6. Glaze with milk and bake in a preheated 220 degree oven for 15 minutes.

Rasberry crumb bars

Rasberry crumb bars. Certainly one of the healthier options on my blog so far. They resemble a breakfast bar so without further a do lets rock and roll.

Ingredients
1 cup Plain flour
1/4 Tsp Baking powder
1/4 Tsp Salt
1 cup of  rolled oats.
1/2 cup packed light brown sugar
1/2 cup unsalted butter
3/4 cup of seedless rasberry jam.

Method
1. Preheat the oven to 175 degrees.
2. In a bowl whisk flour, baking powder and salt. Stir in the rolled oats (porridge oats) and sugar. Using your fingertips break up the lumps.
3. Add 2 cups of the oat mixture to a greased and lined baking tray. I used a rectangle one. Flatten the mixture.
4. Spread the rasberry jam ontop then top with the last of the oat mixture.
5. Bake for 34 -38 minutes.

Chocolate strawberry barrell

On one of my shopping sprees I spotted baby strawberry's. They are ridiculously cute. I desperately wanted to bake something using them. I came up with the idea of a chocolate strawberry barrel. The weather was a bit of a problem when it came to assembling everything but I was still fairly happy with the result.

Ingredients
200g Plain flour
40g Cocoa
240g Caster sugar
3 Tsp Baking powder
80g Unsalted butter
2 eggs
200ml Milk
2 Tsp Vanilla essence
Kitkats 6
Baby strawberry's

Icing
226g butter
600g icing sugar
50g Cocoa
2 Tsp Vanilla essence
4 Tbsp Milk

Method
1. Preheat the oven to 180 degrees.
Grease and line a 8 inch baking tin.
2. Sift the flour, cocoa, baking powder and salt into a bowl and whisk.
3. In another bowl whisk the butter and sugar until fluffy then add vanilla and eggs. Whisking slowly.
4. Add milk and the flour mix alternatively. 
5. Bake for 20 - 25 min.
6. Allow to cool.
7. Using a large round cookie cutter cut out 3 circles of sponge.
8. For the icing whisk butter for 3 min. Add icing sugar and cocoa and whisk slow for 1 min. Add vanilla and milk and whisk for 3 min.
9. Sandwiche the 3 layars of cake together using the chocolate buttercream. Then cover the sides in buttercream.
10. Break up the kitkats into fingers and stick around the cake onto the buttercream.
11. In the top of the barrell place the mini strawberries.

Ice cream cupcakes

Thanks to my good friend Corrina who introduced me to the idea of ice cream cupcakes for the first time. Ideal for kids and big kids too! Finding the correct wafers can be tricky as a lot of shops only stock the long narrow ones.

Ingredients
To make 12
200g Plain flour
40g Cocoa
240g Caster sugar
3 Tsp Baking powder
80g Unsalted butter
2 eggs
200ml Milk
2 Tsp Vanilla essence
Box of wafer cones
Flakes to decorate

Icing
226g Butter softened
600g Icing sugar
2 Tsp Vanilla essence
4Tbsp Milk

Method

1. Heat the oven to 180 degrees.
2. In a large bowl mix flour, cocoa, baking powder, and salt and whisk.
3. In another bowl whisk butter and sugar until fluffy. Add vanilla and eggs abit at a time whisking slow.
4. Add milk and flour mix alternatively.
5. Place the wafer in a bun tray puttin one wafer everywhere a bun case should be. Spoon the mix into the wafers. Only fill each wafer to half way or they will overflow.
6. Bake for 18 -20 min. Allow to cool.
7. For the icing whisk the butter for 3 minutes. Sift in the icing sugar, and beat on low speed for 1 min. Add vanilla and milk beat for 3 minutes. 
8. Pipe the frosting onto the cupcakes like you would see on an ice cream cone. Place a flake ontop and cover in sprinkles.

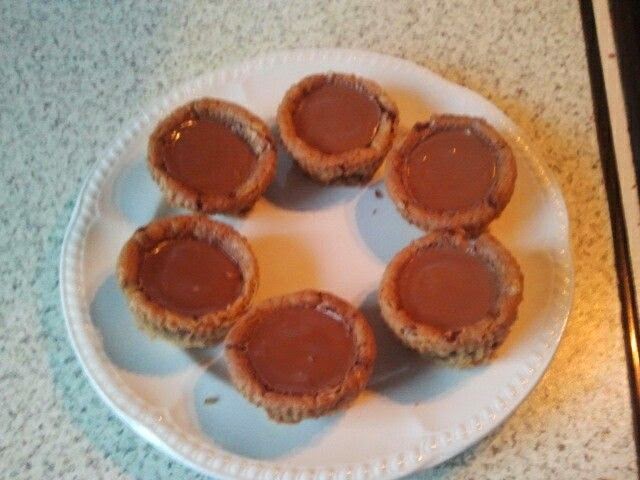
Reeses chocolate chip peanut butter cups

I dunno what possessed me to try and make these but the idea came to me and I said shur how hard can it be! Plus the peanut butter cups were half price in the shop :).

Ingredients
Unsalted butter for greasing
175g Plain flour sifted
1 Tsp Baking powder
125g Margarine melted
85g Light muscovado sugar
55g Caster sugar
1/2Tsp Vanilla essence
1 egg
125g Plain chocolate chips
Reeses peanut butter cups 12

Method
Pop the peanut butter cups in the freezer 5 min before you start.
1. Preheat the oven to 190 degrees and put bun cases into a bun baking tray. Stay with me here I'm not mad I swear!
2. Place all the ingredients in a large mixing bowl and beat until well combined. It feels so good to chuck everything in together.
3. Spoon tablespoons of the cookie dough into the bun cases. Don't overfill the cases maybe put 2 tablespoons or a little less into each.
4. Bake for 15 - 20 min keep an eye on them.
5. When they come out of the oven take the peanut butter cups from the freezer and with your hand press them down into the top of each cookie cup. The fact they are slightly frozen keeps them from melting and breaking.

Twirl cupcakes

Continuing my quest to recreate all bars as cupcakes I moved onto the Twirl! Even saying the word makes me want one with a cup of tea. Getting the colour right on this one was important so after getting some purple colouring all that was left was to add yellow somehow. Of course it was after these were done I made the discovery of a 2 colour piping nozzle. Oops.

Ingredients
To make 12 cupcakes

9 oz Plain flour
3 oz Cocoa
3 Tsp Baking powder
17oz Caster sugar
300ml Milk
150 ml Olive oil
2 eggs
300ml Boiling water
Twirls 6

Icing
226g Butter softened
600g Icing sugar
2 Tsp Vanilla essence
4Tbsp Milk
Purple colouring
Yellow chocolate balls

Method
30 min Before starting halve 6 of the Twirl fingers and place in the freezer.
1. Heat the oven to 180 degrees.
2. In a large bowl mix flour, cocoa, baking powder, and sugar.
3. Pour in milk, oil, egg and beat until smooth.
4. Pour in boiling water and beat.
5. Pour into cases, adding a frozen Twirl into each case and bake for 15 minutes.
6. Allow to cool.
7. For the icing whisk the butter for 3 minutes. Sift in the icing sugar, and beat on low speed for 1 min. Add vanilla and milk beat for 3 minutes.  Add purple food colouring.
8. Pipe the frosting onto the cupcakes and place half a Twirl finger ontop of each one.
9. Sprinkle yellow chocolate balls over the icing.

Coconut Lamingtons

Until now I had never heard of lamingtons. I racewalked before in Lemington spa but thats about as close as it gets! As I searched for inspiration I stumbled across coconut ones and that was it decision made.

Ingredients
Oil or butter for greasing
175g Plain white flour
1Tbsp Baking powder
175g Unsalted butter softened
175g Caster sugar
3 Eggs beaten
1 Tsp Vanilla essence
2 Tbsp Milk
2 Tbsp Desiccated coconut

Icing and coating ingredients
500g Icing sugar
40g Cocoa powder
85ml Boiling water
70g Unsalted butter melted
250g Desiccated coconut

Method

1. Preheat oven to 180 degrees. Grease and line a 9 inch square tin. I used a round one recession and all beggers cant be choosers right?

2. Sift the flour and baking powder Into a large bowl and add butter, caster sugar, eggs and vanilla essence. Beat well until the mixture is smooth then stir in the milk and coconut.

3. Spoon the mixture into the tin and smooth the top with a knife. Bake for 30 -35 min until risen and golden brown.

4. Leave to cool. Cut into 16 squares and prepare to create the greatest mess you have ever seen. 

5. For the icing , sift the sugar and cocoa into a bowl. Add water and butter and stir until smooth. Spread the coconut out on a large plate. Dip each square of sponge into the icing then into the coconut covering all sides. I was advised to use a fork to dip but everytime I dipped it fell in so I resorted to dunking with my fingers. Boy it was messy. 

6. Place on baking paper to set.

Double Chocolate Mint Sponge

Who doesn't love mint? Its jaw dropping good :) of course thats just my opinion. I came across this recipe in Edinburgh and couldn't wait to get stuck in. Of course our local shops in Ireland don't exactly have everything so I had to swap a few bits.

Ingredients
Oil or melted butter for greasing
150g plain flour
2 tbsp cocoa
1 tbsp baking powder
175g unsalted butter softened
6oz caster sugar
3 eggs beaten
1 tbsp milk
1 mint aero bar crushed
140g chocolate spread
2 mint crisp bars crushed & frozen
Some melting chocolate

Method
1. Preheat the oven to 180 degrees. Grease two 8 inch sandwiche tins and line with baking paper. ( I used 9 inch but sssssh)
2. Sift the flour, cocoa and baking powder into a bowl and beat in the butter, sugar and eggs. Mix until smooth. Add in frozen mint crisp bars and stir in milk.
3.Spread the mixture into the baking tins. Bake for 25 to 30 min until risen and firm. Turn out onto a rack to cool.
4. Sandwiche the 2 cakes together with chocolate spread.  I used Panda :).
5. Sprinkle crushed mint aero over the top and drizzle melted chocolate over it.

I was pleasantly surprised with how it turned out and boy was it tasty! Very simple to make too :)

Sunday, 24 August 2014

Nutella Cupcakes

Thankfully I made these before the price of Nutella increased. It was one of my toughest times reading that hazelnuts were becoming scarce so the price would increase :( many a night has been spent devouring it. Time to discover a new comfort food I think. Below is my recipe for Nutella cupcakes.

Ingredients
To make 12 cupcakes

9 oz Plain flour
3 oz Cocoa
3 Tsp Baking powder
17oz Caster sugar
300ml Milk
150 ml Olive oil
2 eggs
300ml Boiling water

Icing
230g Unsalted butter
240g Icing sugar
222g Nutella
3-4Tbsp Heavy cream
2 Tsp Vanilla essence
Sprinkle of salt
Chocolate chips
Hershey' s chocolate sauce

Method

1. Heat the oven to 180 degrees.
2. In a large bowl mix flour, cocoa, baking powder, and sugar.
3. Pour in milk, oil, egg and beat until smooth.
4. Pour in boiling water and beat.
5. Pour into cases, and bake for 15 minutes.
6. Allow to cool.
7. For the icing whisk the butter for 3 minutes. Sift in the icing sugar first then Nutella and beat on  medium speed for 1 min. Add vanilla then the cream and  beat for 3 minutes. 
8. Pipe the frosting onto the cupcakes and sprinkle chocolate chips ontop. Drizzle Hershey's chocolate sauce over it.

Bounty Cupcakes

I'm a big fan of coconut so I figured why not bake with it. As a kid I loved Bounty bars so behold the Bounty cupcake.

Ingredients
To make 12 cupcakes

9 oz Plain flour
3 oz Cocoa
3 Tsp Baking powder
17oz Caster sugar
300ml Milk
150 ml Olive oil
2 eggs
300ml Boiling water
Bounty 6 bars
Desiccated coconut

Icing
226g Butter softened
600g Icing sugar
2 Tsp Vanilla essence
4Tbsp Milk
2oz Cocoa
Desiccated coconut

Method
30 min Before starting halve 6 of the bounty segments and place in the freezer.
1. Heat the oven to 180 degrees.
2. In a large bowl mix flour, cocoa, baking powder, some coconut and sugar.
3. Pour in milk, oil, egg and beat until smooth.
4. Pour in boiling water and beat.
5. Pour into cases, adding a frozen bounty into each case and bake for 15 minutes.
6. Allow to cool.
7. For the icing whisk the butter for 3 minutes. Sift in the icing sugar, cocoa and beat on low speed for 1 min. Add vanilla and milk beat for 3 minutes. 
8. Pipe the frosting onto the cupcakes and place a bounty ontop of each one.
9. Sprinkle coconut over the icing.

Rolo Cupcakes

Who would you give your last Rolo to? If it was me .. I'd say nobody! Those packets are far too small :). I haven't mastered caramel frosting just yet so instead I used yellow buttercream.

Ingredients
To make 12 cupcakes

9 oz Plain flour
3 oz Cocoa
3 Tsp Baking powder
17oz Caster sugar
300ml Milk
150 ml Olive oil
2 eggs
300ml Boiling water
Rolos 3 pks

Icing
226g Butter softened
600g Icing sugar
2 Tsp Vanilla essence
4Tbsp Milk
Yellow food colouring
Hershey's chocolate sauce

Method
30 min Before starting place 12 rolos in the freezer.
1. Heat the oven to 180 degrees.
2. In a large bowl mix flour, cocoa, baking powder and sugar.
3. Pour in milk, oil, egg and beat until smooth.
4. Pour in boiling water and beat.
5. Pour into cases, adding a frozen rolo into each case and bake for 15 minutes.
6. Allow to cool.
7. For the icing whisk the butter for 3 minutes. Sift in the icing sugar and beat on low speed for 1 min. Add vanilla and a dash of yellow food colouring and milk beat for 3 minutes. 
8. Pipe the frosting onto the cupcakes and place a rolo ontop of each one.
9. Drizzle the Hershey' s chocolate sauce over the icing.

Put your pj's on, throw your feet up and sink your teeth in :)

Tuesday, 12 August 2014

Malteaser Cupcakes

Seen as though I'm a self proclaimed chocaholic I continue to search for ways to combine cupcakes and chocolate. Malteaser cupcakes I thought why not! How hard can this be. The first time I made them I made the dreadful mistake of putting Malteasers straight from the packet into the cupcake batter and baking them. Sorry to those who tried it and your teeth. I learnt a little secret after that! If you put the Malteasers in the freezer for at least 30 min beforehand they don't harden in the oven they only defrost.


So now that you know all my secrets lets get baking!

Ingredients

2 bags of malteasers 

4 1/2 oz of plain flour

45g cocoa

1 1/2 tsp baking powder

245g caster sugar

150ml full fat milk

75ml olive oil

1 egg

150ml boiling water

Icing

113g softened butter

300g icing sugar

25g cocoa

1 tsp vanilla essence

2 tbsp milk

Method

1. Make sure half your Malteasers are frozen. Preheat oven to 180 degrees.Pop buncases into a bun tray.

2. In a large bowl mix flour, cocoa, baking powder and sugar.

3. Pour in milk, oil, egg and whisk until nice and smooth.

4. Pour in the boiling water and beat.

5. Pour the mixture into the bun cases and pop a frozen malteaser into each. Bake for 15min. 

6. Remove from the oven and cool. 

7. For the buttercream icing whisk the butter in a bowl for what feels like eternity or 3 min. Then add the icing sugar and cocoa and whisk slow for 1 min. Finally add the vanilla and milk and whisk for another eternity. 

8. Pipe the icing onto the cupcake and top with a malteaser. 


Thursday, 24 July 2014

Brookies part cookie part brownie :)


What is a Brookie you might say? To tell you the truth I had never heard of them either until one morning I stumbled across what turned out to be chocolate heaven. For those of you that don't know me I'm a bit of a chocoholic. A Brookie is half brownie half cookie. When I intially looked through the receipe I was a bit intimidated but what the heck why not give it a go!

Brownie
Cooking chocolate 250g
Unsalted butter 200g
Caster sugar 200g
3 eggs
Plain flour 125g
Cocoa 50g

Cookie
Plain flour 175g
1 tsp baking powder
Melted margarine 125g
Light muscovado sugar 85g
Caster sugar 55g
1/2 tsp vanilla extract
1 egg
Plain chocolate chips 125g

Method:

First off you need a nice big rectangular baking tin. Pop a bit of melted butter on it so they don't stick and line with baking paper.
For this receipe I could have done with a hen with both parts requiring eggs.  The bottom layer will be the brownie. So preheat the oven to 175 degrees. Break up the chocolate and put it with the butter over a saucepan of boiling water. Watch the magic happen. Eventually as the Spice girls said '2 become 1'. Meanwhile in another bowl whisk the sugar and the chuck chuck (eggs) until smooth and creamy. Add the chocolate mix to the egg mix and mix . Sift in the flour and cocoa ensuring you destroy your clothes in pure Caitriona style. Stir and spread evenly in the base of the tin.

Place all the cookie ingredients in a large bowl and beat until smooth and silky. Once mixed spread ontop of the brownie mixture and pop it in the oven. Keep an eye as it bakes and somewhere around 20 min it should be ready. Allow to cool!

Thursday, 12 June 2014

My Water Safety Tips Please Read!!!

I think it's fair to say wow now this is fabulous weather! In this blog I will be taking a break from my usual baking posts and writing about safety in and around water. As a trained Water Safety Instructor and having several years experience as a lifeguard & leisure centre manager this is an issue very close to my heart.  Unfortunately with fine weather always comes tragedy. Alot of the time these tragedies can be avoided by taking certain precautions.

1. Only swim in lifeguarded areas. Local piers, lakes etc are not suitable for swimming. Currents, tides and hazards make swimming in these areas treacherous.
2. When out in the water on jet ski's or boats always wear a lifejacket which has been safety checked.
3.  Never consume alcohol in or around water!Never swim after consuming alcohol.
4. Kids with armbands should not be allowed swim in open water. I heard of a case where a child jumped into deep water raising his arms up in the air. When he hit the water the 2 armbands shot off his arms sending him under water.
5. Never swim alone.
6. Never swim after eating.
7. Never swim after hard exercise.
8. Never use air mattresses in open water. Tides and currents can carry the mattress far out to sea in the blink of an eye.
9. Always swim parallel to the beach. Never swim away from the shoreline.
10.If you cannot swim do not allow the beach water past your hips. Going any further out is extremely dangerous if you lose your balance, step in a hole or get carried by a wave.
11. Never swim in an unknown area. Sharp objects, reefs etc can cause injury!
12. Never swim in around weeds. These can easily catch your feet.
13. If you notice a missing ring buoy report it to the relevant authority.
14. Always empty paddling pools after use. A toddler could easily fall in.
15. Never take your eyes off children near water.

IMPORTANT
NEVER  enter the water to save someone!CALL 999! When a person is drowning the first thing they will do is grab you to push themselves up. In a distressed situation panic sets in and they do not know what they are doing! Very commonly double drownings occur. These happen when someone jumps in to rescue another. Always put a barrier between you and the victim. Call 999 and use rescue aids nearby from the bank until help arrives. Often your voice can be the most vital rescue aid. Reassure the victim and tell them to kick.

How to use a ring buoy with no rope attached
1.Call for help
2.Using 1 hand swing the ringbuoy by your side.Take a few swings so you can throw the distance. 
3. Never hold or throw it by its rope. Hold the main frame.
4. Aim for in front of the person and throw.
5. Talk to them, tell them what to do and reassure them everything is ok!
6. Lie down on the river bank shoulders behind the edge and as they kick in, grab the top of one of their wrists and pull them into the bank.Assist them out and seek medical attention.


                                            How to use a ring buoy with rope attached
1. Call for help
2.  Place the end of the rope under your foot. Coil up the remaining rope leaving a little slack to throw the ring buoy.
3. Hold the rope in 1 hand and the ringbuoy in the other.
4. Take a few practice swings and throw both the rope and ring buoy together keeping your foot on the end of the rope at all times.
5. Aim for behind the person when the rope is attached. That way you can pull it towards them.
6. Tell them grab on and as you pull them in, drop down on your stomach shoulders behind the edge and ensure your foot is on the rope at all times. Never lose contact with the rope. 
7. As they kick in, grab the top of one of their wrists and pull them into the bank.Assist them out and seek medical attention.

What can i use if there is no ringbuoy

1. Clothing- Use a pants/Jumper by holding one end and throwing the other end for them to grab. This will only work if they are close to the bank.
2. Ball/ Inflatable object- Throw the object in front of the person. Tell them to grab it and kick.
3. A stick- Hold one end and let them grab the other end.

Use common sense! We are surrounded by several things we could use in an emergency situation. Only ever grab the top of their wrist that way if they try to pull you in you can let go. 

Don't forget to call for help 999!
Don't forget to inform your kids of these safety tips!


Please stay safe and enjoy this beautiful weather :)

Thursday, 29 May 2014

Athletics Cake

Athletics has made me the person I am today :) Representing Ireland in my 1st International race at the age of 12 I had caught the athletics bug!It wasn't always easy. In those days the smoking ban hadn't even been thought of so unless I wanted to cough up a lung the following day at training the pub scene was a no go. However this didn't stop me! When others drank and smoked I racewalked. I loved it! Travelling from country to country meeting athletes from all over the world I was living the dream. Due to a severe hip injury I had to take a step back in recent years but i've never lost my passion for it. So making this cake I had a blast.

As it was for an annual function it needed to feed quite a few athletes. From the beginning I had imagined a 2 tier cake surrounded by a tartan athletics track with perhaps a club singlet and a medal draped over it. This would be my first 2 tier cake which was rather exciting. But what colour would I make it? It needs to be unisex and sharp to the eye so a lemon yellow seemed just right given the club colours are green and white. The bottom tier would be a 9 inch round and the top tier a 7 inch round. Everyone loves madeira so why reinvent the wheel. 

Using the madeira recipe from my previous blogs I baked both cakes in the oven and allowed them to cool. After the cakes cooled I cut each cake into 3 layers which were then filled with buttercream.Once filled I covered the sides also with buttercream. The buttercream provides the perfect glue for the fondant to stick. Then I rolled out 6 packs of ready to roll icing and covered each cake. Smoothing the sides with my handy smoother gadget. I popped the 9 inch cake onto the centre of the cake board then placed the 7 inch on top. From white fondant I cut out the shape of the club singlet and covered the borders with green. I was pleasantly surprised with how good it looked. Using edible ink I printed the club logo and placed it in the centre of the singlet which was then draped off the cake. Out of fondant I then made a medal which was draped off the other side. In Between the fondant accessories I cut and stuck on green bubbles which really brought out the club colours. 

Finally I made a fondant asiscs running shoe for the top of the cake and the tartan track to surround the cake. The finished product looked great .... such a relief :)
Athletics cakeAthletics cake

Wednesday, 7 May 2014

Juicy Couture Handbag Cake

Firstly it needs to be said that everyone who knows me will understand my very limited knowledge of handbags! I've been known to pass the odd comment on a night out like ' Jasus what's in that a body?' or ' Did ya leave anything behind?'. I'm a pocket lady. Never the less when I was asked to create a Juicy Couture Handbag I was gunning for the challenge. The obvious first step for a lass such as myself was to google the handbag to see what it actually looks like.Everyday is a school day in the Bake With Cat kitchen :). I took one look at the logo and freaked. Talk about detail and bling ..... I figured I would do the logo from edible ink. Once that was taken care of it was time to get down and dirty.

The main structure of the bag I made from sheets of madeira mixture. Cutting them to size and carving the shape as I went along. In between each layer of cake was a layer of buttercream acting as a cement for the structure. I'm not gonna lie after the carving and butter creaming I was feeling nervous. But if there's one thing i've learnt from baking its never judge until the final details are on the cake. I chose pink fondant for the colour. I rolled out 3 packets of ready to roll fondant which was quite a physical workout in itself. 3 packets of fondant and 2 stone lighter I was eventually ready to put the fondant on the cake. Using a rolling pin to lift the icing and drape it over the cake i began to smooth the edges and sides. I then rolled out brown fondant which would act as the leather surround. Using a stitching tool I made stitching along the fondant and stuck the fondant on with edible glue. I then took some white rings of fondant and glued on some edible gold dust to make buckles which were then placed along the top of the bag.


Handbag cake

Using strips of pink and brown fondant I wrapped them around each other to create a funky rope like bling for the bag. The zips were also done with gold edible glitter and finally the side pocket, some straps and the logo were stuck on. The final product .............
Handbag cake

What good is a handbag with out some make up? Out of fondant I shaped some eyeshadow, lipstick and a brush.